|
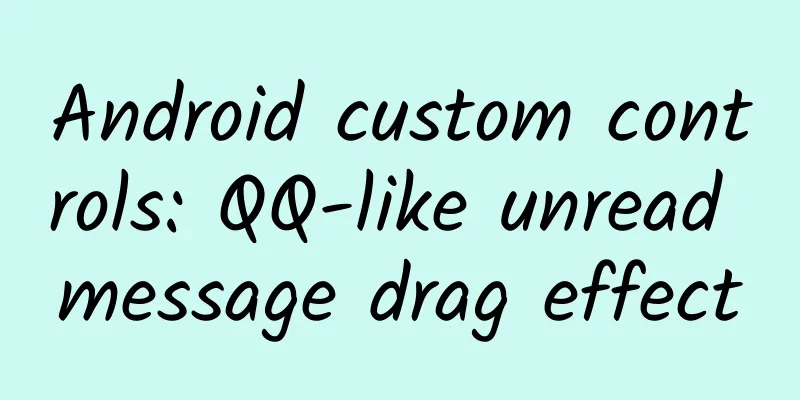
QQ's unread messages are a fun effect. Taking advantage of the recent time, after referring to some online information, this time I implemented a drag-and-drop red dot that imitates QQ's unread messages: First, let's start with the most basic principles and look at a picture: How to draw this picture? Actually, we draw two circles first, and then connect the tangent points of the two circles through Bezier curves to achieve this effect. As for the concept of Bezier curves, I won't explain it here. You can find it by searching Baidu. How to calculate the tangent points? Let's review some junior high school math knowledge. After looking at this graph, it should be easy to find the four tangent points. Now the idea is very clear, let's start according to our idea. First, we calculate the tangent point and the tool class of each coordinate point - public class GeometryUtils {
- /**
- * As meaning of method name .
- * Get the distance between two points
- * @param p0
- * @param p1
- * @return
- */
- public static float getDistanceBetween2Points(PointF p0, PointF p1) {
- float distance = ( float ) Math.sqrt(Math.pow(p0.y - p1.y, 2) + Math.pow(p0.x - p1.x, 2));
- return distance;
- }
-
- /**
- * Get middle point between p1 and p2.
- * Get the midpoint of the line connecting two points
- * @param p1
- * @param p2
- * @return
- */
- public static PointF getMiddlePoint(PointF p1, PointF p2) {
- return new PointF((p1.x + p2.x) / 2.0f, (p1.y + p2.y) / 2.0f);
- }
-
- /**
- * Get point between p1 and p2 by percent.
- * Get the coordinates of a point between two points based on the percentage
- * @param p1
- * @param p2
- * @param percent
- * @return
- */
- public static PointF getPointByPercent(PointF p1, PointF p2, float percent) {
- return new PointF(evaluateValue(percent, p1.x, p2.x), evaluateValue(percent, p1.y, p2.y));
- }
-
- /**
- * Calculate the value of the fraction position from start to end according to the division value . The range of fraction is 0 -> 1
- * @param fraction
- * @param start
- * @param end
- * @return
- */
- public static float evaluateValue( float fraction, Number start, Number end ){
- return start.floatValue() + ( end .floatValue() - start.floatValue()) * fraction;
- }
-
- /**
- * Get the point of intersection between circle and line.
- * Get the intersection point of the line with slope lineK and the circle passing through the specified center.
- *
- * @param pMiddle The circle center point.
- * @param radius The circle radius.
- * @param lineK The slope of line which cross the pMiddle.
- * @return
- */
- public static PointF[] getIntersectionPoints(PointF pMiddle, float radius, Double lineK) {
- PointF[] points = new PointF[2];
-
- float radian, xOffset = 0, yOffset = 0;
- if(lineK != null ){
- radian= ( float ) Math.atan(lineK);
- xOffset = ( float ) (Math.sin(radian) * radius);
- yOffset = ( float ) (Math.cos(radian) * radius);
- } else {
- xOffset = radius;
- yOffset = 0;
- }
- points[0] = new PointF(pMiddle.x + xOffset, pMiddle.y - yOffset);
- points[1] = new PointF(pMiddle.x - xOffset, pMiddle.y + yOffset);
-
- return points;
- }
- }
Then let's take a look at our core drawing code. The code comments are quite complete, so I won't explain it here. - /**
- * Draw the Bezier curve part and the fixed circle
- *
- * @param canvas
- */
- private void drawGooPath(Canvas canvas) {
- Path path = new Path();
- //1. Calculate the radius of the fixed circle based on the current distance between the centers of the two circles
- float distance = ( float ) GeometryUtils.getDistanceBetween2Points(mDragCenter, mStickCenter);
- stickCircleTempRadius = getCurrentRadius(distance);
-
- //2. Calculate the dragLineK (opposite side vs adjacent side) of the perpendicular line passing through the center of the two circles. Find the coordinates of the four intersection points
- float xDiff = mStickCenter.x - mDragCenter.x;
- Double dragLineK = null ;
- if (xDiff != 0) {
- dragLineK = ( double ) ((mStickCenter.y - mDragCenter.y) / xDiff);
- }
-
- // Get the intersection points of the two circles with the perpendicular lines passing through the center of the two circles (the two perpendicular lines are parallel, so dragLineK is equal).
- PointF[] dragPoints = GeometryUtils.getIntersectionPoints(mDragCenter, dragCircleRadius, dragLineK);
- PointF[] stickPoints = GeometryUtils.getIntersectionPoints(mStickCenter, stickCircleTempRadius, dragLineK);
-
- //3. Use the 0.618 point of the line connecting the two circles as the control point of the Bezier curve. (Choose a control point near the middle point)
- PointF pointByPercent = GeometryUtils.getPointByPercent(mDragCenter, mStickCenter, 0.618f);
-
- // Draw two circles to connect and close
- path.moveTo(( float ) stickPoints[0].x, ( float ) stickPoints[0].y);
- path.quadTo(( float ) pointByPercent.x, ( float ) pointByPercent.y,
- ( float ) dragPoints[0].x, ( float ) dragPoints[0].y);
- path.lineTo(( float ) dragPoints[1].x, ( float ) dragPoints[1].y);
- path.quadTo(( float ) pointByPercent.x, ( float ) pointByPercent.y,
- ( float ) stickPoints[1].x, ( float ) stickPoints[1].y);
- canvas.drawPath(path, mPaintRed);
- // Draw a fixed circle
- canvas.drawCircle(mStickCenter.x, mStickCenter.y, stickCircleTempRadius, mPaintRed);
- }
At this point, we have implemented the core code for drawing, and then we add a listener for touch events to dynamically update the center position of the dragPoint and the radius of the stickPoint. When the hand is raised, add an attribute animation to achieve a rebound effect. - @Override
- public boolean onTouchEvent(MotionEvent event) {
- switch (MotionEventCompat.getActionMasked(event)) {
- case MotionEvent.ACTION_DOWN: {
- isOutOfRange = false ;
- updateDragPointCenter(event.getRawX(), event.getRawY());
- break;
- }
- case MotionEvent.ACTION_MOVE: {
- //If the distance between the two circles is greater than the maximum distance mMaxDistance, execute the drag end animation
- PointF p0 = new PointF(mDragCenter.x, mDragCenter.y);
- PointF p1 = new PointF(mStickCenter.x, mStickCenter.y);
- if (GeometryUtils.getDistanceBetween2Points(p0, p1) > mMaxDistance) {
- isOutOfRange = true ;
- updateDragPointCenter(event.getRawX(), event.getRawY());
- return false ;
- }
- updateDragPointCenter(event.getRawX(), event.getRawY());
- break;
- }
- case MotionEvent.ACTION_UP: {
- handleActionUp();
- break;
- }
- default : {
- isOutOfRange = false ;
- break;
- }
- }
- return true ;
- }
-
- /**
- * Gesture lift action
- */
- private void handleActionUp() {
- if (isOutOfRange) {
- // When the dragPoint range has exceeded mMaxDistance, and then drag the dragPoint back to the mResetDistance range
- if (GeometryUtils.getDistanceBetween2Points(mDragCenter, mStickCenter) < mResetDistance) {
- //reset
- return ;
- }
- //dispappear
- } else {
- //When the finger is lifted, the bounce animation
- mAnim = ValueAnimator.ofFloat(1.0f);
- mAnim.setInterpolator(new OvershootInterpolator(5.0f));
-
- final PointF startPoint = new PointF(mDragCenter.x, mDragCenter.y);
- final PointF endPoint = new PointF(mStickCenter.x, mStickCenter.y);
- mAnim.addUpdateListener(new AnimatorUpdateListener() {
- @Override
- public void onAnimationUpdate(ValueAnimator animation) {
- float fraction = animation.getAnimatedFraction();
- PointF pointByPercent = GeometryUtils.getPointByPercent(startPoint, endPoint, fraction);
- updateDragPointCenter(( float ) pointByPercent.x, ( float ) pointByPercent.y);
- }
- });
- mAnim.addListener(new AnimatorListenerAdapter() {
- @Override
- public void onAnimationEnd(Animator animation) {
- //reset
- }
- });
-
- if (GeometryUtils.getDistanceBetween2Points(startPoint, endPoint) < 10) {
- mAnim.setDuration(100);
- } else {
- mAnim.setDuration(300);
- }
- mAnim.start();
- }
- }
At this point, the core code of our drag and drop has basically been completed, and the actual effect is as follows: Now that the drawing of the little red dot is basically over, we have to think about the real difficulty. That is, how to apply the GooView we mentioned above to practice? Looking at the actual effect, our little red dot is placed inside the listView. If this is the case, it means that the drag range of our GooView will definitely not exceed the area of the parent control item. So how do we make the little red dot drag freely across the entire screen? Let's sort out our ideas here. 1. First put a small red dot in the item layout of listView. 2. When we touch this little red dot, hide this little red dot, and then initialize a GooView according to the position of the little red dot in our layout and add it to the WindowManager, so that GooView can be dragged full screen. 3. When adding GooView to WindowManager, record the position of the initial red dot stickPoint, and then determine the next logic based on whether the positions of stickPoint and dragPoint exceed our disappearance limit. 4. Depending on the final state of GooView, display the rebound or disappearance animation. Now that we have the idea, let's move on to the code. According to the first step, we complete the item layout of listView. - <?xml version= "1.0" encoding= "utf-8" ?>
- <RelativeLayout xmlns:android= "http://schemas.android.com/apk/res/android"
- android:layout_width= "match_parent"
- android:layout_height= "80dp"
- android:minHeight= "80dp" >
-
- <ImageView
- android:id= "@+id/iv_head"
- android:layout_width= "50dp"
- android:layout_height= "50dp"
- android:layout_centerVertical= "true"
- android:layout_marginLeft= "20dp"
- android:src= "@mipmap/head" />
-
- <TextView
- android:id= "@+id/tv_content"
- android:layout_width= "wrap_content"
- android:layout_height= "50dp"
- android:layout_centerVertical= "true"
- android:gravity= "center"
- android:layout_marginLeft= "20dp"
- android:layout_toRightOf= "@+id/iv_head"
- android:text= "content - "
- android:textSize= "25sp" />
-
- <LinearLayout
- android:id= "@+id/ll_point"
- android:layout_width= "80dp"
- android:layout_height= "80dp"
- android:layout_alignParentEnd= "true"
- android:layout_alignParentRight= "true"
- android:layout_alignParentTop= "true"
- android:gravity= "center" >
-
- <TextView
- android:id= "@+id/point"
- android:layout_width= "wrap_content"
- android:layout_height= "18dp"
- android:background= "@drawable/red_bg"
- android:gravity= "center"
- android:singleLine= "true"
- android:textColor= "@android:color/white"
- android:textSize= "12sp" />
- </LinearLayout>
- </RelativeLayout>
The effect is as follows. It should be noted that compared with the real experience of QQ, when clicking around the red dot, you can directly drag the red dot. Considering that the click range of the red dot is relatively small, a parent layout with a width and height of 80dp is added to the red dot. Then we change the touch red dot event to touch the red dot parent layout, so that as long as we click the parent layout range of the red dot, GooView will be added to the WindowManager. In the second step, we complete the code to add GooView to WindowManager. Since our GooView is initially added from the touch event of the red dot in the listViewItem, we first complete the implementation of the listView adapter. - public class GooViewAapter extends BaseAdapter {
- private Context mContext;
- //Record the position that has been removed
- private HashSet< Integer > mRemoved = new HashSet< Integer >();
- private List<String> list = new ArrayList<String>();
-
- public GooViewAapter(Context mContext, List<String> list) {
- super();
- this.mContext = mContext;
- this.list = list;
- }
-
- @Override
- public int getCount() {
- return list.size () ;
- }
-
- @Override
- public Object getItem( int position) {
- return list.get(position);
- }
-
- @Override
- public long getItemId( int position) {
- return position;
- }
-
- @Override
- public View getView(final int position, View convertView, ViewGroup parent) {
- if (convertView == null ) {
- convertView = View .inflate(mContext, R.layout.list_item_goo, null );
- }
- ViewHolder holder = ViewHolder.getHolder(convertView);
- holder.mContent.setText(list.get(position));
- //item fixed red dot layout
- LinearLayout pointLayout = holder.mPointLayout;
- //item fixed red dot
- final TextView point = holder.mPoint;
-
- boolean visiable = !mRemoved. contains (position);
- pointLayout.setVisibility(visiable ? View .VISIBLE : View .GONE);
- if (visiable) {
- point.setText(String.valueOf(position));
- pointLayout.setTag(position);
- GooViewListener mGooListener = new GooViewListener(mContext, pointLayout) {
- @Override
- public void onDisappear(PointF mDragCenter) {
- super.onDisappear(mDragCenter);
- mRemoved.add (position);
- notifyDataSetChanged();
- Utils.showToast(mContext, "position " + position + " disappear." );
- }
-
- @Override
- public void onReset(boolean isOutOfRange) {
- super.onReset(isOutOfRange);
- notifyDataSetChanged();//Refresh ListView
- Utils.showToast(mContext, "position " + position + " reset." );
- }
- };
- //Listen for all touch events in the point parent layout
- pointLayout.setOnTouchListener(mGooListener);
- }
- return convertView;
- }
-
- static class ViewHolder {
-
- public ImageView mImage;
- public TextView mPoint;
- public LinearLayout mPointLayout;
- public TextView mContent;
-
- public ViewHolder( View convertView) {
- mImage = (ImageView) convertView.findViewById(R.id.iv_head);
- mPoint = (TextView) convertView.findViewById(R.id.point);
- mPointLayout = (LinearLayout) convertView.findViewById(R.id.ll_point);
- mContent = (TextView) convertView.findViewById(R.id.tv_content);
- }
-
- public static ViewHolder getHolder( View convertView) {
- ViewHolder holder = (ViewHolder) convertView.getTag();
- if (holder == null ) {
- holder = new ViewHolder(convertView);
- convertView.setTag(holder);
- }
- return holder;
- }
- }
- }
Since listview needs to know the status of GooView, we add an interface in GooView for listview to callback and process subsequent logic. - interface OnDisappearListener {
- /**
- * GooView Disapper
- *
- * @param mDragCenter
- */
- void onDisappear(PointF mDragCenter);
-
- /**
- * GooView onReset
- *
- * @param isOutOfRange
- */
- void onReset(boolean isOutOfRange);
- }
Create a new class that implements the OnTouchListener and OnDisappearListener methods, and then set this implementation class to the red dot Layout in the item. - public class GooViewListener implements OnTouchListener, OnDisappearListener {
-
- private WindowManager mWm;
- private WindowManager.LayoutParams mParams;
- private GooView mGooView;
- private View pointLayout;
- private int number;
- private final Context mContext;
-
- private Handler mHandler;
-
- public GooViewListener(Context mContext, View pointLayout) {
- this.mContext = mContext;
- this.pointLayout = pointLayout;
- this.number = ( Integer ) pointLayout.getTag();
-
- mGooView = new GooView(mContext);
-
- mWm = (WindowManager) mContext.getSystemService(Context.WINDOW_SERVICE);
- mParams = new WindowManager.LayoutParams();
- mParams.format = PixelFormat.TRANSLUCENT; //Make the window support transparency
- mHandler = new Handler(mContext.getMainLooper());
- }
-
- @Override
- public boolean onTouch( View v, MotionEvent event) {
- int action = MotionEventCompat.getActionMasked(event);
- // When pressed, add the custom View to the WindowManager
- if ( action == MotionEvent.ACTION_DOWN) {
- ViewParent parent = v.getParent();
- // Request its parent View not to intercept Touch events
- parent.requestDisallowInterceptTouchEvent( true );
-
- int [] points = new int [2];
- //Get the position of pointLayout on the screen (the coordinates of the upper left corner of the layout)
- pointLayout.getLocationInWindow(points);
- //Get the initial center coordinates of the small red dot
- int x = points[0] + pointLayout.getWidth() / 2;
- int y = points[1] + pointLayout.getHeight() / 2;
- // Initialize the information, number and coordinates of the currently clicked item
- mGooView.setStatusBarHeight(Utils.getStatusBarHeight(v));
- mGooView.setNumber(number);
- mGooView.initCenter(x, y);
- //Set the current GooView disappearance monitor
- mGooView.setOnDisappearListener(this);
- // Add the current GooView to WindowManager
- mWm.addView(mGooView, mParams);
- pointLayout.setVisibility( View .INVISIBLE);
- }
- // Forward all touch events to GooView for processing
- mGooView.onTouchEvent(event);
- return true ;
- }
-
- @Override
- public void onDisappear(PointF mDragCenter) {
- //disappear Next step completed
- }
-
- @Override
- public void onReset(boolean isOutOfRange) {
- // When the dragPoint bounces back, remove the View and add it again the next time ACTION_DOWN
- if (mWm != null && mGooView.getParent() != null ) {
- mWm.removeView(mGooView);
- }
- }
- }
In this way, we have basically completed most of the functions. Now there is only one step left, which is the processing after GooView goes out of range and disappears. Here we use a frame animation to complete the explosion effect. - public class BubbleLayout extends FrameLayout {
- Context context;
-
- public BubbleLayout(Context context) {
- super(context);
- this.context = context;
- }
-
- private int mCenterX, mCenterY;
-
- public void setCenter( int x, int y) {
- mCenterX = x;
- mCenterY = y;
- requestLayout();
- }
-
- @Override
- protected void onLayout(boolean changed, int left , int top , int right ,
- int bottom) {
- View child = getChildAt(0);
- // Set the View to the specified position
- if (child != null && child.getVisibility() != GONE) {
- final int width = child.getMeasuredWidth();
- final int height = child.getMeasuredHeight();
- child.layout(( int ) (mCenterX - width / 2.0f), ( int ) (mCenterY - height / 2.0f)
- , ( int ) (mCenterX + width / 2.0f), ( int ) (mCenterY + height / 2.0f));
- }
- }
- }
-
- @Override
- public void onDisappear(PointF mDragCenter) {
- if (mWm != null && mGooView.getParent() != null ) {
- mWm.removeView(mGooView);
-
- //Play the bubble explosion animation
- ImageView imageView = new ImageView(mContext);
- imageView.setImageResource(R.drawable.anim_bubble_pop);
- AnimationDrawable mAnimDrawable = (AnimationDrawable) imageView
- .getDrawable();
-
- final BubbleLayout bubbleLayout = new BubbleLayout(mContext);
- bubbleLayout.setCenter(( int ) mDragCenter.x, ( int ) mDragCenter.y - Utils.getStatusBarHeight(mGooView));
-
- bubbleLayout.addView(imageView, new FrameLayout.LayoutParams(
- android.widget.FrameLayout.LayoutParams.WRAP_CONTENT,
- android.widget.FrameLayout.LayoutParams.WRAP_CONTENT));
-
- mWm.addView(bubbleLayout, mParams);
-
- mAnimDrawable.start();
-
- // After playback ends, delete the bubbleLayout
- mHandler.postDelayed(new Runnable() {
- @Override
- public void run() {
- mWm.removeView(bubbleLayout);
- }
- }, 501);
- }
- }
***Attached is the complete demo address: https://github.com/Horrarndoo/GooView |


![The five elements landing system of community operation, the only common framework diagram for all big names to earn 100,000 yuan a day [audio course]](/upload/images/67cc3393a2134.webp)